Wednesday, 29 April 2009

Cased Cards!

I've been feeling less than creative these days but needed a couple of cards. So I resorted to shamelessly caseing some very talented stampers. I'm hoping it will jump start something!

This first card is based on this one by Kristina Werner. I happened to have the same stamp so it appealed to me. I know - who am I kidding? I only changed the color scheme and the sentiment - I used my quickutz alphabet for it.


This second one was based on this card by Mercy Kerin. Again, pretty much the same card except for the colour scheme and sentiment. Oh and I left the knot off the ribbon!


Anyway, I hate to case so literally but both cards were awesome and I needed a boost. I have managed to do a couple of sketch cards since these, so maybe it worked! Thanks to Kristina and Mercy for their amazing designs!

Sunday, 26 April 2009

MFT Idol - Judges Entry Week 7

One of my good friends ordered a bunch of cards for me and I've been busy working on them. I must say that it feels good to stamp just for the fun of it - no pressure! This week's idol challenge was "frame it". I decided since I was doing a card with an MFT image anyway, I might as well enter. I made a ribbon frame using the tutorial from the technique challenge. The paper is SU's Parisian Breeze and the layout is from the Weekend Sketch challenge (I love sketch challenges!).

Hope you had a great weekend! I was very productive - purged a ton of stuff - it's that spring cleaning urge setting in!! Later taters!

Friday, 24 April 2009

Bellarific!!

Hello girlies!! I made this card for Bellarific Friday - our inspiration piece was pink and brown. I pulled out my new Wendy Papillion and paired her with some Basic Grey Bittersweet paper. I used Jen del Muro's sketch for you to try for the layout. The ribbon rose was made from a tutorial I found while blurfing one day - here it is - it's a video and very easy to follow!

I've actually had a bellarific day today! My son is off school today for a PA day and we met some friends at a new indoor playground. It was fantastic! I treated the kids to lunch and we did some errands as well. As soon as my daughter gets up, we're heading outside to enjoy the beautiful weather. I've finally managed to kick the bear of a headache I've had for the last couple of days. And I'm finished moping about not moving on in the MFT idol contest. Life is good and God is great!! Thanks for reading friends!!

Monday, 20 April 2009

MFT Idol Week 5 One Layer Card

Edited to add: HERE is the link to the voting thread!!

I had such a hard time deciding what to do for this week's MFT Idol contest. Our challenge was to make a one layer card using only MFT stamps (of course!). Way back in January I made this one layer card for the MFT guest designer contest (and won an ambassador spot with it!) so I felt like I had used up all my one layer ideas!

I decided to play with the MFT digital paper packs and see what I could come up with. Here is the card I ended up creating - it took a little playing to get it right - but I did all my work in Microsoft Word (I lost my Photoshop when we upgraded to Vista!).


I thought that I would maybe post some screen shots here so you could see how I went about it - in case you want to try it for yourself! Jody Morrow created some awesome tutorials on how to purchase, download, locate, open and print the papers using only the document viewer (I linked you to the first one, but there's quite a few of them in that same forum). But since we were limited to one layer, I needed to make a few adjustments.

First I opened a new document in Word, then I used the Insert Picture command and selected my digital paper (they are downloaded as jpegs), in this case one of the papers from the Spring pack. I reduced the margins on my Word document as low as I could and stretched the paper out by grabbing the corner and dragging. Once I decided on my card size (6" x 4.5") and orientation, I was able to determine where to drop my boxes. To make the boxes, I simply used the text box tool and drew a box on top of the paper image. I then adjusted the size of the box (to 1.5") and copied and pasted it twice so I'd have 3 identical boxes. I lined up the boxes by using the rulers on the top and left sides.
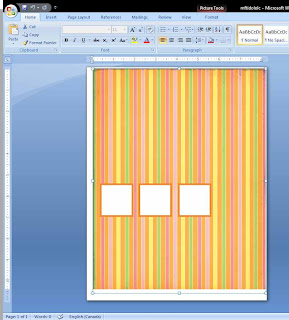
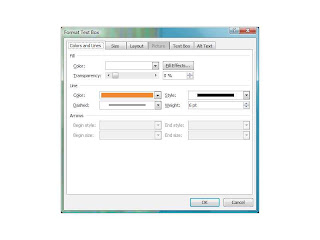
Once I had my text boxes placed where I wanted them, I decided that instead of having black outlines, I wanted them to have coloured borders so it would look like my boxes were layered onto cardstock. By right clicking on my box, I was able to select Format Text Box which is shown below. I changed the line to a weight of 6 pt. and changed the colour. For the colour, I wanted to use SU's Pumpkin Pie, so I grabbed the RGB code for Pumpkin Pie off of Splitcoast (in the downloads forum) and selected my custom colour for the line.
Once I printed off my paper, I trimmed it down to size. I then used Eclipse masking strips (so much better than post-its!) to mask around the squares so I could stamp my Hooga Boogas in the squares. I coloured them, sponged the edges of the card and outlined the boxes with a W3 copic. I decided to take advantage of the paper's striped design and weave some ribbon. I made small slits in the border of the stripes and fed the ribbon through. I think the rest is fairly self-explanatory, but shoot me an email if you have any questions!

Sorry for the epic post, but I thought there might be people who didn't know that they could use Word with their digital paper packs.

So as always, voting opens tonight at 10pm and remains open until Wed. at 10pm EST. Would you consider voting for me? I'll come back tonight and edit with the link to the voting thread! Thanks for all your kind comments and support! It really means the world to me!

Sunday, 19 April 2009

Rumor has it.....

Isn't this just the sweetest image? Jamie made me get it - after I saw this awesome card of hers. And what do you know - guess who is the featured stamper over on Splitcoast today? Jamie!! Yippee girl - so happy for you!

I actually made this card as a thank you for some blog candy I won to Stamping Bella from another amazing stamper - Joanne Basile (the inside reads "You're simply sweet. Thanks a million"). I used the layout from the Weekend Sketch Challenge 77 and made my card a tad bit bigger than normal - 4.5" x 6". I actually have a ton of envelopes in this size to use up so it all works! The paper is Bo Bunny and I just adore the colour combo in it. Well that's it for me! I'll be back Tuesday with my MFT Idol card! Have a great Sunday friends!

Friday, 17 April 2009

Still Alive!!

I am still alive, just recovering from traveling to Calgary (by myself with NO kids!!) over the Easter weekend and a stomach bug. I haven't stamped much lately since we were given a week off of MFT Idol and I took that to heart. I'm back at it now, our assignment for this week is to make a one layer card (OLC). Just to clarify - that's one layer of paper - one layer only!!! I've been playing with a couple of ideas - just need to see which one works best. I'll post my project on Tuesday in hopes of moving on to the next week!

In the meantime, I wanted to pass on a link that my son and I have been enjoying. This blog is not stamping related - it's a guy with a passion for photography and Lego, who takes a picture everyday of something Lego related. He's also got a great sense of humour, I enjoy the captions as much as his set up and photography. I have no affiliation, just stumbled upon his blog and we check it regularly.

Hopefully I'll be back tomorrow with a card! I've been inking up my new Bugs and ChiChis from Stamping Bella and I got an awesome new set in Calgary that I can't wait to use! Later taters!!

Tuesday, 7 April 2009

MFT Idol Week 4

This week's challenge for the MFT Idol contest was to use the set Build a Bouquet (that Kim so generously gifted us) and make only a card. In a way it was a relief not to have to come up with a whole project, but at the same time, hard to come up with an idea for an outstanding card.

I have been loving playing with fabric lately (I swear it was sitting next to Sherrie Siemens at copic certification!) so I decided to use the second smallest circle in the set to stamp on muslin. I used various shades of green for visual interest. I then used this tutorial to give the circles a finished edge, and stitched them together with yellow embroidery floss.

Each circle is stuffed with batting to make it puffy and 3-d. I used the smallest stem in the set to stamp some antennae and circle punches to make his eyes and antennae tips. I just free hand cut his legs. I made the grass by repeatedly stamping the grass from Hooga Booga in Kiwi Kiss ink on Kiwi Kiss cardstock and then cutting it out. I did that twice and layered the two pieces for depth (the caterpillar is in between the two layers). They're also sponged with Kiwi Kiss ink along the bottom. I used the largest circle in the set to stamp a sun in So Saffron and sponged around the edges with More Mustard.
I also used the various flowers from the set and stamped them in Pretty in Pink and So Saffron inks onto the designer series paper, also in Pretty and Pink and So Saffron. I cut them all out and layered them onto each other. I used buttons threaded with the same yellow embroidery floss for the flower centres. The stems and leaves were stamped onto Kiwi Kiss cardstock with Kiwi Kiss ink and cut out as well.
The background paper is Parisian Breeze and is sponged around the edges with Baja Breeze ink. It's layered onto a So Saffron panel and a Kiwi Kiss card base. The finished card measures 4" x 8".

So....what do you think? As always, I would love it if you would consider voting for me. There are seven of us left and the person with the least amount of votes will not continue on in the contest. Voting opens Tues. at 10pm EST and remains open until Wed. at 10pm EST. I will edit this post tonight with the link to the voting thread. Thanks so much for stopping by!!

Sunday, 5 April 2009

Bad Blue Dog!!

Happy Sunday morning to you!! Just a quick post before I have to leave for Church. I've been feeling a little guilty about really only posting for MFT Idol, but truthfully I didn't expect how much time and effort this contest would take! I haven't done much stamping outside of it, but am going to make more of an effort as I miss stamping just for the fun of it!

I made this card a little while ago. I actually made it for a sketch challenge going on over at the Our Craft Lounge forum but never got it posted in time for the deadline. I picked my paper and colour scheme first and then was stuck on what colour to make the dog. I guess I must have been feeling a little goofy, because I remembered all the Blues Clues we watched when my son was younger. So I made Pat the Bad Dog into Blue the Bad Dog. The paper is Basic Grey Marrakech paired with Pacific Point and Tangerine Tango.

Well, I'm off to start my day. I need to work on this week's MFT Idol entry - we were assigned to use the set Build A Bouquet and make only a card. I'll be back Tuesday to show you what I came up with! Have a great week peeps!! I appreciate each and every one of you who come here to read and comment!!

Tuesday, 31 March 2009

MFT Idol Week 3 Project

Edited to add: Here is the link for voting for MFT Idol. Voting is open now until 10pm EST on Wed.

Man am I ever ready for some wine!! Or is it whine? Regardless, this was a labour of love in a short amount of time.

Our assignment this week was to use this unreleased set - Girls Night Out (available Wed. at 10pm EST). Simple right? NOT! I finally decided to make a "Girls Night In" kit. My friends and I still have young children, so we love to get together at someones house after the kids are in bed and just visit and enjoy each other's company. I actually have a particular group of 4 friends and we (tongue in cheek) refer to our group as the Wondermommies. We enjoy wine, but our tastes are pretty simple, and so a blind tasting just isn't our style. I decided instead to do 5 wine pairings - keeping all the wines from Australia and pairing them with various cheeses. Here's the entire set.

I've been wanting to try to stamp coasters for a while, and this seemed like the perfect opportunity! I used unglazed tumbled tiles and stamped in Brilliance Ink. I shot them with my heat gun and let them sit for a half hour or so. I coloured them with my copics and sponged the edges with distress ink. I then sprayed them with a sealer and put felt on the bottom.

I also made some wine charms. I used the Bling Bet alphabet for the initials (aren't they cute all shrunk down?), stamped in Brilliance on Shrinky Dinks and cut out. I also stamped the wine glass in Brilliance and coloured the reverse side with copics.

Since we're pairing wines with cheeses, I decided to make some cheese pics. I stamped a portion of the main image in the set behind the name of the cheese in a light pink ink.

I think that sitting with Sherrie at copic certification must have inspired me 'cause I decided to stamp some cloth napkins. I adhered ribbon using heat and bond and then stamped in Brilliance, heat set, and coloured with copics.

Finally I made a menu so we would know which pairings were coming next and I made wine journals so we could take notes and jot down names, varietals, and years.

The paper is all Basic Grey Bittersweet. What do you think? I'm excited to put all this to good use and have my Wondermommy friends over! So L, K, N, and B - let's pick a night o.k.?

Voting for MFT Idol opens at 10pm EST tonight (Tues.) and remains open until 10pm EST Wed. night. Would you consider voting for me if you like what you see? You can vote for as many entries as you like, but you can only vote once. I'll edit later tonight and post a link to the voting thread once it's up! Thanks so much for reading!

Monday, 30 March 2009

Still Here!!

I am still here - but we were away all weekend in St. Paul and now I'm madly working on my MFT Idol project for tomorrow!!

Can I just say that you guys are the best?! I really appreciate all your awesome comments and just the fact that you come here to read.

Back tomorrow!!

Wednesday, 25 March 2009

Copic Certification Pics

How lucky am I??? Not only did I get to attend copic certification yesterday, I got to do it with some amazingly talented women!
First I need to shout out to Andrea and Amy!! For some reason I didn't get pictures of them (I'm a big loser!) but they are both SO sweet and amazing!

This is me and Tara! I couldn't have asked for a nicer person to sit beside for the day! She is so sweet and she has a Snow White obsession! She is also an amazing card maker!
This is none other than Kim Reid!!! I was so excited to find out she would be there. I have stalked her for a while - she's on the MFT design team and is a hoot at release parties! When I met her she gave me a big hug - what a sweetie! Love, love, love her!!
Here's one of my other awesome table-mates Julia Stainton! I think Julia's was one of the first blogs that I started reading. She just oozes talent and she is so humble. She also has 5 kids!!
And last but not least, we were lucky enough to sit at the same table as Sherrie Siemens. I've been following Sherrie's blog for a long time! Before she was on any design teams, and she was the reason I started buying copics. It was so nice having her at our table as we got some extra tips and hints. Sherrie will be teaching the Canadian copic classes now and we are lucky to have her!
Anywho!! That's it for me!! I'm off to spend some time with my kiddos! Hope you're all having a great week!

Tuesday, 24 March 2009

MFT Idol Week 2 Project

Edited to Add: Here is the link for voting! Voting is open from 10pm EST Wednesday until 10pm EST Thursday. You can vote for as many contestants as you like, but you can only vote once. My user name is kerryj106. Thanks so much for your support!

What the heck was I thinking when I decided this was the project I wanted to do this week? Our challenge was masking and so I decided I wanted to make a counting book for my daughter. She loves books, and loves counting so it seemed like a good idea at the time.

I am really happy with how it turned out, it was just a LOT of work! I altered a board book with Basic Grey Oh Baby paper and then found images that I could mask in groups. I didn't want to just have a page with a number and an image, so a good friend of mine took my ideas and wrote me a story to go with my images. And it all rhymes! How cool is that?? Thanks so much Laural - you rock!!

I masked Isabelle's tutu for the first page. The second page is actually the only image which wasn't masked. But I flocked it - does that count?!

The cupcakes were masked together and the ice cream scoops were masked onto each other and onto the cone.

The clouds were masked together into a group/storm (I also rock and rolled them) and the sundaes were masked into a group as well. The sundaes are one of my fave MFT images to mask.

On the seventh page, I used the pot from the Chives stamp, and masked it so that I could mask and stamp some flowers coming out of it. I wish I had polka dotted rubber boots - they're just so cute!!

The gifts were masked and stamped 3 times and the balloons were masked and stamped 10 times. Hey I just noticed that the balloons are kind of making a heart shape - cool (and totally unintentional!)!

The books were masked and selectively inked in order to get 11 of them. The butterfly was also masked and stamped repetitively. I pierced some trails on the lower butterflies and added some Doodlebug paper frills for grass.


I think my daughter is going to get a kick out of her personalized book!

Hey will you come vote for me again tonight and tomorrow over in the MFT forum on Splitcoast? I'll edit tonight with the link for voting. Voting is open from 10pm EST Wednesday to 10pm EST Thursday.

Hope you're having a great week! I'm off to copic certification in Toronto today - yippee!!!

Friday, 20 March 2009

A Dreamy Cased Sketch!

I was dying to stamp yesterday just for the fun of it so I made time to sit down and make a couple of cards. I wanted to play along with Michelle's Dreamy Challenge to CASE one of her design team members. I chose to CASE this card of Tosh's. I actually won this stamp set when Our Craft Lounge released their new sets. For my card, I changed the layout and the colour combo but kept the stamp set, the gingham ribbon, the sponging, and the three circle embellishments at the top. The layout I used is actually the sketch challenge over at SCS for this week. Thanks for the inspiration Tosh!

Thursday, 19 March 2009

Top 9 and Sympathy Card

First off I wanted to let you know that I survived the voting and am continuing on to compete next week in the MFT Idol competition! Thank you for your kind comments, your support and also for your vote!!!

Unfortunately, I have need for a sympathy card. My husband`s aunt lost her father and I didn`t have anything ready. I used Stampin Up`s Fifth Avenue Floral on a top note die cut and added a sentiment from Papertrey`s Out on a Limb. Pretty simple but I need to pop it in the mail tout de suite (french for right away!).
Thanks again friends and I`ll be back soon. I`m off to think on my project for next week!

Tuesday, 17 March 2009

Celebrate - MFT Idol Week 1

Alrighty Peeps! Here goes nothing! Here's my entry for the first week of MFT Idol. Our assignment for our first project was the following:

"The theme for the first week is "Celebrate!" We want you to create a card or project that lets us know just how happy you are to be one of the TOP TEN!!!!"

I decided to express my happiness by spreading a little MFT love throughout my house. I made a framed piece to hang on my wall, which makes me celebrate every time I see it! The theme celebrate also reminded me of Celebrate MFT day which is on the 20th of every month. For Celebrate MFT day we are encouraged to use MFT colours - pink, black, and white; so I decided to stick to those guidelines as well.

The final stamped piece measures 12x12 (I mounted all my squares on a 12x12 piece of cardstock) and then mounted it into a 15x15 RIBBA frame that I got at IKEA (love that place!).


I used my favourite images and each one was stamped, coloured, and paper pieced (every one! I've been working on this for days!). I used PTI's raspberry fizz cardstock and patterned paper and intermixed the stamped squares with some old Basic Grey patterned paper (I think the line is Fresh and Funky/Aged and Confused). All the squares are matted on black cardstock and I finished it with a felt flower from SU's flower fusion and a button. I tried to embellish more, but each time I added something it took away from the stamping - and I really wanted the stamping to be the focus.

So hey!! If you're a member over at Splitcoast, would you consider visiting this thread between 10pm EST tonight and 10pm EST on Wed. and vote? I'd love for you to vote for me, but really you should vote for your favourite project!

LinkWithin

Blog Widget by LinkWithin