Oh my - it's been too long since I've blogged, but it seems with the hectic pace of the holiday season that stamping is the first thing to get crossed off my list. I do need to make some Christmas cards in the next couple days, so I'll have those to share soon. My own Christmas cards though got sacrificed for the sake of time. I decided that they just weren't going to get done and ordered photo cards through Costco. I won't let myself get stressed out about things that matter so little in the grand scheme of things!
I did have a chance to make some Magic Reindeer Food for my daughter's preschool friends. I made this a couple of years ago for my son's kindergarten class, so figured it was time again. The reindeer is a Quickutz die and the poem was printed off my computer. The food itself is simply rolled oats and coloured sugar. A fun little thing to give and for the kids to do.
Hope all your Christmas prep is going well! Thanks so much for stopping by!
Monday, 14 December 2009
Saturday, 5 December 2009
Bella Birthday Bash Blog Hop!
Welcome to the Bella Birthday Bash Blog Hop sponsored by Stamping Bella! If you've just happened upon my blog, you can CLICK HERE to start from the beginning at Bloggabella. If you've landed here from Jodi's blog then you're on the right track!
For my card I decided to use a new-to-me Bella, Predictabella. I'd been wanting this one for a while and finally caved when I was in Bellaland a couple weeks ago. I colored her with copics and paired her with some Basic Grey Urban Prairie paper. I stitched the panels and added one of Jo's buttony bows. The layout is from Mercy's Tuesday sketch challenge.
I also coated the crystal ball with crystal effects - fitting no? The stars on the table skirt got Stardust pen added to them.
Three gift certificates for $100 in Bella Bucks will be hidden along the hop, but we’re not telling you where, so be sure to leave some love as you hop!!! Make sure you leave comments on every post to have the best chance of winning! The winners will be announced on Monday, December 7th on the Stamping Bella Blog. MWAH!
Thanks so much for stopping by! Now it's time to hop on over to Debi's blog to see what amazing Bella magic she's created!! Happy Hopping!!
Wednesday, 2 December 2009
MFT December Shop & Hop!
Welcome to my stop along the MFT Shop and Hop! You should have come here by way of Cindy's blog. If not, you definitely want to start at the beginning - Kim's blog.
For my project I was just itching to use the two Pure Innocence girls that I hadn't inked up yet. As I was trying to decide what to do, I spotted a couple of canvases that I picked up at the Michael's dollar bins. They're about 5x5" and they originally had a picture on them that you were supposed to color in with paint. I had always meant to use these in my daughter's room - so I decided to make her a couple of wall hangings.
For the first one I used Fairy Girl. I stitched her some ground to stand on with some DCWV Nana's Nursery paper. I also paper pieced her dress. Her wand has an adorn-it in the middle and her wings and pom poms on her shoes are covered with glitter. Everything is mounted on some Doodlebug sugar coated cardstock and surrounded by Doodlebug paper frills.
For the second one I used Heart Stripes. I stitched together some panels of the same patterned paper and also paper pieced her dress. She's so adorable!!
These new Pure Innocence girls and all the new sets are available now in the MFT store! Last month the PI's sold out fast so you need to be quick if you want to see them in your mailbox!
Don't forget that there's blog candy hidden somewhere along the hop! Where? you ask? I'm not telling! So I'd suggest you leave a comment at each stop for the best chance of winning!
Thanks so much for stopping by! Now it's time to hop over and see the fabulous project that Michele has in store for you! I know you'll be blown away!
Tuesday, 1 December 2009
MFT Teasers - Day 4 Alphadots
Welcome to Day 4 of the My Favorite Things teasers. I was SO excited to hear about this new alphabet set! I use my Bling 'Bet all the time, so couldn't wait to play with Alphadots! I whipped up a couple of quick cards - I love how the alphabet is really the focal point of the cards!
For my first card I created a clothesline and hung the letters from it with mini clothespins. I stamped the letters in Versamark, then embossed with white embossing powder. The letters are actually 3/4" but I only had a 1" punch. I love the way they look with the border though! My poles are bamboo skewers that I cut down to size and the line is hemp. The paper is some old Chatterbox that I had around.
For my second card I paired some Basic Grey Marrakech paper with some MFT digi paper. I printed it out and punched it with a notebook punch. The "U" is from my beloved Bling 'Bet and I again stamped in Versamark and white embossing powder.
My last project, isn't really a project. It was more of a craft time with my daughter. I had been doing some Christmas shopping online and was looking at this book. My son loves Ed Emberley books - he's addicted to the drawing animals one. I figured this would make a great gift since I have NO shortage of ink to make fingerprints with (lol).
Do you see my inspiration piece? Yup - I have a thing for caterpillars. Remember this card that I made for MFT Idol? I think it's because both my kids absolutely adore Eric Carle's The Very Hungry Caterpillar. I know it by heart because we read it so often!
I stamped out my daughters name in Versamagic Chalk Inks and then doodled the face and legs with a black glaze pen. My daughter wouldn't let me embellish it at all - just the adorn-its in the corners. I managed to snap one picture before she confiscated it. It's now living on her bedroom door.
Thanks again for stopping by and reading my blah, blah! I appreciate your comments more than you know! Don't forget to stop by Kim's blog after 11am EST today for a list of all the designers previewing this set.
Monday, 30 November 2009
MFT Teasers - Day 3 Pure Innocence
Welcome back to Day 3 of the My Favorite Things teasers! Today we're previewing what have quickly become my fave MFT images - the Pure Innocence girls! There are 4 new ones this month (quads to join last month's quints - if you're an MFT junkie!) and they are ADORABLE!!
For my first project I decided to make an acetate card. Now I've never made one of these before, but it was actually pretty easy! The hardest part was waiting for the acetate to dry (I'm SO not a patient person!).
I stamped the acetate with the snowflakes from an older set, Baby It's Cold Outside. The Merry Kissmas Pure Innocence girl was stamped and colored on white cardstock. If you look closely, you can see the liquid applique on their hats (toques for us Canadians!), the glitter on her pom poms, and the clear glaze on the mistletoe berries. I die cut some shapes with my nesties to use behind the image and on the back panel. Then inside was stamped with the sentiment "Merry Kissmas".
As soon as I saw Presents for You, I knew that I wanted to make some gift tags. Let me tell you - if you receive one of these from me, you must be special, cause I want to hoard them!! I stamped and colored the PI onto white cardstock, and die cut it with the top note die. Then I sponged the edges. I also die cut a piece of Basic Grey Eskimo Kisses paper and trimmed it out to fit.
The To and From sentiment are included along with a couple of other sentiments. I can't wait to attach these to my gifts!
Thanks again for stopping by today! You can find a complete list of all the designers previewing the Pure Innocence line on Kim's blog at 11am EST today! Check back tomorrow for another peek!
Sunday, 29 November 2009
MFT Teasers - Day 2
Welcome back!! Today we're previewing 2 new sets being released Wednesday night at My Favorite Things.
The first is another Flopsey! I just love this rabbit with his big ears. This time around Flopsey is all about chocolate - a bunny after my own heart. I created a card and a box to go with it to hold - what else? - chocolate!
The layout of my card is an old Mojo Monday sketch and I used some Basic Grey Bittersweet papers. I just love this sentiment that comes with the set (there are 3 others as well!).
One of my favorite things to do with Flopsey is to make him all fuzzy - so I covered him with fun flock. I actually apply the fun flock to a sticky sheet and then stamp on the fuzzy sheet. It gives amazing coverage! Let me know if you're interested in a tutorial and I'll whip one up if so.
The window treat box was super easy to put together and I used this tutorial from Splitcoast. There's another fuzzy Flopsey on the box and it's filled with Lindt chocolates - my hubby's fave!
The second set being previewed was previously available as part of an MFT kit, and is now available on its own. Love Machine is super fun to work with and I decided to make a "boy" card to have in my stash.
I used some Cosmo Cricket Early Bird papers and sewed all around each panel. Actually, I sewed without thread - it was a super easy way to pierce my panels without doing it by hand! I added some of MFT's baby braddies (LOVE them!) and coated my love machine in Crystal Effects. He's super glossy and shiny!
Thanks so much for stopping by today!! Make sure you check out Kim's blog after 11am est today to find links to all the other designers with sneak peeks as well! Check back tomorrow as I have previews of my fave part of the release!!
Saturday, 28 November 2009
MFT Teaser
Hello friends!! I am so excited to be part of the MFT December temporary design team. Kim offers her regular design team a break for Christmas and has asked some extremely talented MFT fans to help out! I was honored to be asked!
Today's peek is from a new set by Amanda Baird called Love at First Sight. It has a couple super sweet images and some awesome sentiments.
For my card I used the main image - this woman who is obviously in love. But I decided to make her in love with chocolate (because really - who isn't?)! I used one of the other images - the truffle for the object of her affection! I coated the truffle in caramel latte fun flock to make it look like one of those truffles that have been dusted in cocoa. Both images were stamped on one of MFT's cream perfect panels. Where has this paper been all my life?? It is super thick but doesn't soak up the ink like some other heavy paper that I have. It's also extremely easy to blend on.
To see other teasers with this set, check out Kim's blog after 11am est where she'll have a list of all the designers sharing today. Check back tomorrow for another peek, o.k.?
Monday, 23 November 2009
So You Think You Can Stamp Finals!
This is it - the final week for MFT's So You Think You Can Stamp contest! One person will take home the title and a prize of free stamps for 6 months! Cool eh?
I was lucky enough to be chosen as one of the top 6 and so have been working on my project for the last 4 days. Each contestant was paired with a MFT design team mentor to work with, and I was lucky enough to be paired with Jody Morrow! Can I just tell you what a sweetie she is? I have chatted with Jody in the MFT forum for a while now - but got to talk to her on the phone and over email. Besides being SUPER talented, she was so helpful, kind and supportive. Thank you so much Jody!!
Our theme this week was "freestyle - anything goes, stamp for your lives". So since this stamping contest was based on the t.v. show "So You Think You Can Dance", I decided to be inspired by the show itself. I admit that I'm not a regular fan of the show, but I did spend quite some time over the last 6 weeks watching videos on You Tube.
Did you know that Who's That Girl (known from here on in as WTG) came in top six in the So You Think You Can Dance contest? Seriously!! And you know what happens after the season ends? The top contestants go on tour!! WTG had an amazing time on tour and scrapbooked her experiences.
I looked up the actual tour schedule for SYTYCD and picked 6 tour stops that I thought would be fun to visit (since there were 6 weeks of this contest). I also picked some activities in each city that WTG would have a chance to do while she was on tour. The WTG stamps then became pictures and I created journaling to go with each stop. The journaling was printed on some MFT digi paper and then punched with a notebook border punch.
Here's the front cover. I actually made this album totally from scratch. I cut the chipboard to size (6.5" x 6.5") and painted it. Then I punched holes and decorated it. All of the pages in my book are stitched on all 4 sides. The papers are all from We R Memory Keepers - Madame Royale. It is all held together by binder rings.
The first page - having a Starbucks at the airport before taking off!
We're finally off on the tour for So You think You Can Dance. Making Top 6 was amazing but this is a dream come true! Nothing like sitting at the airport with a hot cup of Starbucks, knowing that all my hopes and dreams are about to come true, and while they are, I'll be surrounded by the best group of friends I could have imagined.
First stop - Chicago!
Wind Shmind... Not even a hurricane could stop me from purse shopping on the Magnificent Mile. Louis, Coach, Chanel, Gucci ... Come to Mama! We shopped 'til we dropped.
2nd stop - Miami
H-O-T. Hello Miami. I don't know what was hotter, the weather or the dancing. There wasn't much time for sightseeing, but we managed to sneak in dinner and drinks at Emeril's Miami Beach and an amazing view of the ocean all at the same time.
Third stop - Houston
Ahhhhhhh! Peace. This tour has taken a lot out of me. I thought the competition was exhausting, but the tour requires even more out of us. What's a girl to do? That's right. Take advantage of the beautiful spa in our hotel – can you say “Conga-line Coral”? Of course, no day is complete until I've pulled out my laptop and caught up with my friends back home!
Fourth stop - Los Angeles
Fame excess! Thanks, Miley for that description of the amazing L.A.! I was in my glory swooning over Jimmy Choos on Rodeo Drive. I needed those shoes for my appearance on the Ellen Show. Yes. THAT Ellen! We danced with her, and of course took pictures. It's possible that I am truly her biggest fan.
Fifth stop - Las Vegas
What happens in Vegas ... ends up in my scrapbook! Vegas is almost all about glitz and glamour. My two favorite things, and of course this stop was my favourite. We got VIP'd into XS where we rocked our moves til last call. After my wild night, I was in need of some relaxation. Nothing like a little downward dog to restore some balance before our next stop.
Last stop - Portland
The weather matched our moods as we hit the last stop of the tour. It was dreary and miserable, exactly how we felt when we knew things were coming to an end. We weren't downcast for long... instead, we curled up in fluffy hotel robes and had a giant pyjama party. PILLOW FIGHT!!!!! I can't believe how much I'll miss everyone.
Back page - relaxing after the whirlwind tour!
Ahhhhhhhhhh! Time to relax. This tour has been amazing, but I'm so ready to sit in a nice warm bubble bath, have a glass of wine and reminisce.
Front and back covers
Side view
Thanks so much for visiting and reading! I appreciate each and every one of you!
Thursday, 12 November 2009
Bellarific 'Tini!
I had a chance to play along with Bellarific Friday today. This week's theme was a wild card - meaning that the sky's the limit! I didn't get a chance to play along with last week's Christmas theme, so decided I would make a Christmas card.
I used the Chrismatini image and coloured it with copics as well as a Sakura stardust pen. The sentiment is a rub on and the trim was something I picked up last year because it was so fun! A simple card using Karen Giron's sketch layout from this week. I'm not in time to link up, but here it is anyway.
I'm super excited because I'm off to Bellaland on Sat. and again on Sun. to take some classes with Paulabella and Lindabella! Can't wait!!! Have a great weekend!
Tuesday, 10 November 2009
A Modern Girls Night Out!
Alrighty then!! We're at week 5 of MFT's So You Think You Can Stamp contest. I only have this week and next week to get one of those coveted 6 spaces and compete in the finals! Our theme this week was "Contemporary – Fresh and modern, think clean lines and simple style".
I decided that I wanted to use the cityscape from Going Places and then played with a couple of other images until I settled on Girls Night Out. Boy - would I love to be one of those two women!! I stamped the cityscape in Brilliance Ink on some bluish shiny cardstock that I had squirreled away and embossed it with clear powder. I cut them out and layered them using dimensionals. The paper behind the cityscape and below is Memory Box Butterfield and was in one of the MFT monthly kits. I paper pieced the image using some older Basic Grey papers and added some rhinestones. So who wants to go for drinks?
Sunday, 8 November 2009
Dazzling Medallion!
I created a couple of cards the other day that were Stampin Up only for my demo's blog. I hadn't really had a chance to play with this medallion stamp that I fell in love with. I grabbed a colour combo off of Splitcoast and the rest was super quick.
I used craft white ink and then embossed with heat and stick powder and added dazzling diamonds. The sparkle doesn't show as well in the picture - in real life it's so shimmery and pretty! The sentiment is from the level 2 hostess set Asian Artistry. The melon mambo panel is mounted on black and Kraft.
Well friends - hope you're having a great weekend! We're off to Church and then I'm spending some quality time with my favorite girlfriends and going to a toy warehouse to tackle some Christmas shopping! Later taters!
Tuesday, 3 November 2009
Hip Hop Snowmen!
This is my entry for week 4 of MFT's So You Think You Can Stamp contest. I'm still hoping for one of those remaining spots so I can compete in the final week's competition. This week's theme was hip hop. I decided to go less literal with this week's theme and just be inspired by hip hop music, attire, and artists.
For the main portion of my card I decided to use the stained glass technique - to represent all the bling. I embossed my image with gold embossing powder on acetate. Remember all those big gold necklaces and earrings of the 80's? I then filled the reverse of the image with Crystal effects and added 3 different colours of glitter - crystal, aqua, and peridot. I did each colour separately so they wouldn't mix.
This side panels were stamped using the In the Background set. Lots of blue to represent denim. Then I used some gold ribbon and made a gold ribbon rose/medallion and used it as part of my sentiment. I "popped" the image up on dimensionals since popping is part of hip hop. I used the sentiment "Joy" cause I was thinking of that song Joy and Pain by Rob Base and DJ EZ Rock - another hip hop song from the 80's.
I decided to make my card into a cd holder as I wanted to send some Christmas music to my niece and nephew. So I made a pocket to "lock"the cd into place. "Locking" is another big part of hip hop.
All in all a super fun challenge! Hope you're having a good beginning to your week!
Saturday, 31 October 2009
A Chichi Hop!!
Welcome to the Chichiboulie Blog Hop sponsored by Stamping Bella! If you've just happened upon my blog, you can CLICK HERE to start from the beginning at Bloggabella.
I actually only own one Chichi, but I do love her!! I used Wendy Papillion for my card and paired her with some Basic Grey Indian Summer paper. I paper pieced her apron and added glitter to her wings and the butterflies. I hope it looks like a fall blustery day! I am so in love with the ribbon rose in the top right corner. I cased it from this card by Regina. I simply punched a 1" circle out of cardstock and covered it in adhesive (I used my ATG gun). Then I twisted the ribbon and pushed it into the adhesive, starting in the middle. I wound it around itself until the entire circle was covered. It was super quick and easy and I love the look! Thanks so much for hopping by!
How about a prize? In addition to the fabulous eye candy, we have decided to hide a prize somewhere along the hop! One pre-selected blogger will draw a random winner from the comments on her post, and the winner will receive a $25 Gift Voucher to Stamping Bella!!! The fun part is...we're not telling you who it is! So as you hop, make sure you leave comments on every post so you have a chance to win!! We will announce the winner on Friday in the Splitcoast forum. MWAH!
Thanks so much for stopping by! Now it's time to hop on over to see Karolyn!
Friday, 30 October 2009
Halloween Teacher Treats!
I made some really quick Halloween treats for my son and daughters teachers. I had picked up this cute mummy stamp from the $1.50 bin at Michaels - so decided to go with a mummy theme. The papers are old KI memories and Creative Imaginations. The sentiment is from Stampin' Up. I whipped out three of these cards in 15 mins.
Then I bought some over sized Hershey bars and made a wrap for each bar. Then I turned them into mummies! Just some punched circles and torn cardstock sponged with Soft Suede ink. Super easy!
Make sure you check back tomorrow to see my card for the Stamping Bella Chichiboulie blog hop! It will be up at 11am EST!
Kidlet Bellarific Friday!!
I love to call my children by the name kidlets! Don't know why - just do! This is my entry for this week's Bellarific Friday. The theme was anything kid related and I had just gotten this new stamp - Noah the Computer Guy! I paired him with some Cosmo Cricket Early Bird paper and added some brads and hemp twine. This one will go to my son, who is in need of a little encouragement!
I am so excited because I signed up to take a couple of classes at Stamping Bella in a couple of weeks. I am taking a copic class with Lindabella and a pencil class with Paulabella! I can't wait!
And there are new releases over at Stamping Bella today, so I'm anxious to see the new rubber!
Anyway, I'm off to the pumpkin patch with my dd's preschool. I have another post going up tonight with some of my Halloween treats and also one tomorrow for the Bella Chichiboulie Blog Hop!! So check back k? Later taters!
Tuesday, 27 October 2009
Elegant Polar Love!
Well...here's my entry for week 3 of MFT's So you think you can stamp contest. Our theme this week was the waltz. I decided to pull out these polar bears that are being released next week. I got them for purchasing a certain amount last month.
I actually had a lot of fun with this card. I pulled out some Basic Grey Figgy Pudding paper that I've been hoarding and drew my hills freehand. I adhered each layer separately and stitched each layer. I added some dazzling diamonds glitter to the edge of each hill. I paper pieced the scarves using the same cardstocks and stamped them with smaller patterns from a couple of other sets. I cut some linen thread and adhered it to the scarves as the fringe.
The ribbon was done by simply running the ribbon through by itself and then pulling on one of the threads to ruffle it. I adhered it down with some glue dots and stitched the button into place.
Well..that's all I've got!! I'm off to wait for my hubby to get home from the airport! Thanks so much for stopping by!
Sunday, 25 October 2009
Buttony Bowed Monsters!
Hello friends!! I finally had a chance to stamp yesterday and was able to make a card to enter into Joanne's blog candy draw. Joanne created an awesome video tutorial for her buttony bows and challenged us to make a card including one for her birthday blog candy celebration.
I decided to get these cute little Stamping Bella Monsters inky and paired them with some Basic Grey Urban Prairie paper as well as some Bermuda Bay cardstock. For the layout, I used Jen's Sketch for you to Try from this week as I fell in love with this sketch! I watched Jo's video and tried my hand at the bow. What do you think? Not bad for a bow challenged lefty eh?
Alrighty then - I'm off to rake a whole ton of leaves and do some laundry and baking! No rest for the wicked! Hope you're enjoying the last of your weekend! Later taters!
Thursday, 22 October 2009
Enjoy this commercial break....
So I figured since I haven't had a chance to stamp and don't have anything paper craft related to share, that maybe you'd enjoy a recipe? This is one of my faves!
Corn Flake Caramels
3 bars Mackintosh Toffee
3 tbsp butter
3tbsp sweetened condensed milk
3-4 cups of cornflakes
Melt the toffee and butter in a pot. When soft, add milk and cornflakes. Press into a greased square pan.
Now for you Americans, Mackintosh Toffee is the best toffee in the world. It comes in bars and is originally from England.
Tragically, I can't find it here anymore. This last time I made these, I ended up using the square caramels (like the Kraft ones). I think I substituted about 22 for 1 bar. So you'd need 66 caramels.
Just be warned - these are the kind of thing where you could eat the pan if you weren't careful! Not that I would know about that!
Have a great Friday friends! I'm hoping to stamp this weekend so I'll have something to share!
Monday, 12 October 2009
MFT So You Think You Can Stamp?!
Remember MFT Idol?? Well MFT is running another contest - this time titled "So you think you can Stamp?". Obviously it's based on the tv program So you think you can Dance. The first week entries are due tonight by midnight so I've been working hard on my entry.
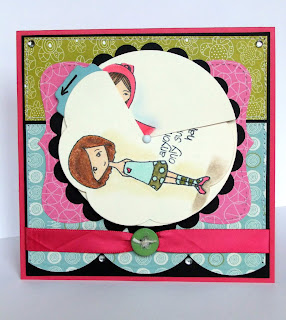
This week's theme was "West Coast Swing – All the cool kids are doing it, and so can YOU! This is a dance filled with FUN! Think lift, flip and spin! MFT Stamps must be the prominent images used on your project." I went through a couple different ideas before I settled on doing a moving/magic circle card. I used a couple different tutorials - but mainly this one by Jackie Topa. Basically you rotate the circle using the tab and the first image is hidden and the second is revealed. Here are a couple of pics showing the transition:
Starting position:
1/4 turn:
1/2 turn:
3/4 turn:
End Position:
I'm pretty pleased with how this turned out. I don't make a lot of technique cards so it took a couple of tries before I got it right. The green and blue panels are sewn on and the paper is from a K & Co. Carolyn Gavin stack.
Hope you had a wonderful weekend! Later taters!
Subscribe to:
Posts (Atom)